Marbled Concrete Candle with Wax Flower Embellishments
Marbled Concrete Candle with Wax Flower Embellishments

Ingredients
For the Concrete Container
- 1 1/2 cups Jesmonite AC100 base powder
- 1/2 cup Jesmonite AC100 liquid
- 1/4 teaspoon pigment for Jesmonite, white or cream
- 1/4 teaspoon pigment for Jesmonite, light brown or tan
For the Candle
- 2 cups soy wax flakes, for candle body
- 3 candle wicks, with metal bases
- 1/8 teaspoon candle dye, yellowish or light beige
- 1 tablespoon fragrance oil, candle safe, optional
For the Wax Flower Embellishments
- 1/2 cup soy wax flakes, for wax flowers
- 1/8 teaspoon white candle dye
Instructions
- 1
In a small mixing bowl, combine 3/4 cup of Jesmonite AC100 base powder with 1/4 cup of Jesmonite AC100 liquid and the white/cream pigment. Mix thoroughly until smooth and lump-free. Set aside.
⏱️ 5 min
- 2
In a separate small mixing bowl, combine the remaining 3/4 cup of Jesmonite AC100 base powder with the remaining 1/4 cup of Jesmonite AC100 liquid and the light brown/tan pigment. Mix thoroughly until smooth and lump-free.
⏱️ 5 min
- 3
Pour both colored Jesmonite mixtures simultaneously or alternately into the fluted silicone mold, swirling gently with a stick or skewer to create a marbled effect. Do not overmix.
⏱️ 2 min
- 4
Gently tap the mold on your work surface several times to release any trapped air bubbles. Allow the Jesmonite to set and harden according to manufacturer's instructions, typically 30-60 minutes for demolding. The full cure time is usually 24 hours.
⏱️ 5 min
- 5
Once the Jesmonite has fully set and is firm to the touch, carefully demold the concrete container by gently peeling back the flexible silicone mold. Set the container aside to continue curing.
⏱️ 3 min
- 6
In a double boiler or wax melting pot, melt 1/2 cup of soy wax flakes for the flowers over low heat until fully liquid. Stir in the white candle dye until evenly distributed.
⏱️ 5 min
- 7
Pour the melted white wax into the small round silicone flower molds. Allow to cool and harden completely (about 15-20 minutes), then carefully demold the wax flowers. Set aside.
⏱️ 5 min
- 8
Once the concrete container is fully cured, attach three candle wicks to the bottom of the container using wick clips or a small amount of melted wax. Space them evenly.
⏱️ 3 min
- 9
Place wooden wick-centering tools across the top of the container, threading the wicks through the holes to keep them upright and centered.
⏱️ 1 min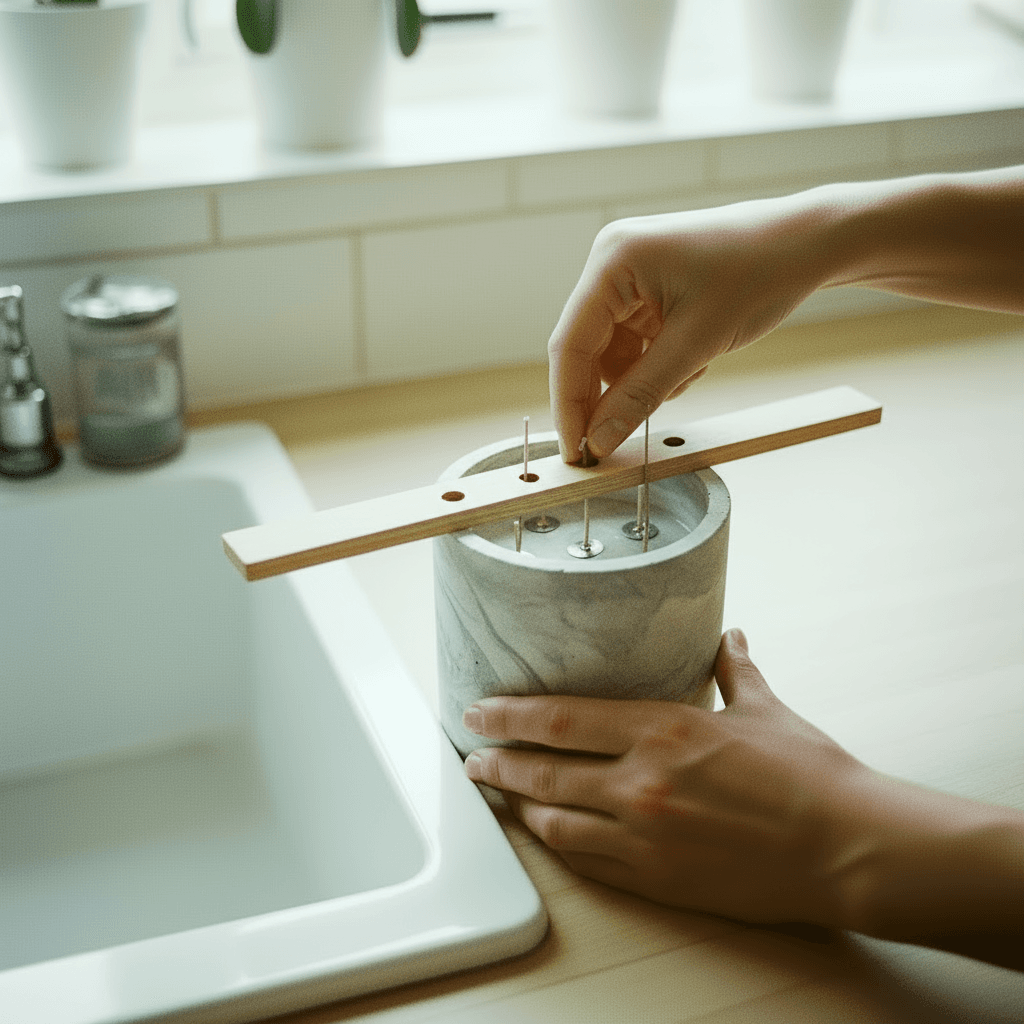
- 10
In a clean double boiler or wax melting pot, melt 2 cups of soy wax flakes for the candle body over low heat until fully liquid (around 180°F). Remove from heat, stir in the yellowish/light beige candle dye and fragrance oil (if using) until well combined.
⏱️ 10 min•🌡️ 180
- 11
Allow the wax to cool slightly to its pouring temperature (usually around 160-170°F, check wax manufacturer's recommendations). Carefully pour the melted wax into the concrete container, filling it almost to the brim.
⏱️ 2 min•🌡️ 165
- 12
Let the candle wax set for about 30-60 minutes, or until a thin skin forms on top but the wax is still warm and pliable. Use a heat gun on a low setting to gently warm and smooth the top surface of the candle, removing any imperfections or sinkholes. Be careful not to melt the wax too deeply.
⏱️ 5 min
- 13
Once the candle has fully cooled and hardened (several hours or overnight), remove the wick centering tools. Gently press three wax flowers onto the surface of the candle, arranging them decoratively. A small dab of melted wax can be used to secure them if needed.
⏱️ 3 min
- 14
Trim the wicks to about 1/4 inch above the wax surface before lighting. Your marbled concrete candle with wax flower embellishments is now complete!
⏱️ 1 min
Kitchen Tools
Nutrition Facts (per serving)
Marbled Concrete Candle with Wax Flower Embellishments
Ingredients
For the Concrete Container
- 1 1/2 cups Jesmonite AC100 base powder
- 1/2 cup Jesmonite AC100 liquid
- 1/4 teaspoon pigment for Jesmonite, white or cream
- 1/4 teaspoon pigment for Jesmonite, light brown or tan
For the Candle
- 2 cups soy wax flakes, for candle body
- 3 candle wicks, with metal bases
- 1/8 teaspoon candle dye, yellowish or light beige
- 1 tablespoon fragrance oil, candle safe, optional
For the Wax Flower Embellishments
- 1/2 cup soy wax flakes, for wax flowers
- 1/8 teaspoon white candle dye
Instructions
- 1
In a small mixing bowl, combine 3/4 cup of Jesmonite AC100 base powder with 1/4 cup of Jesmonite AC100 liquid and the white/cream pigment. Mix thoroughly until smooth and lump-free. Set aside.
⏱️ 5 min - 2
In a separate small mixing bowl, combine the remaining 3/4 cup of Jesmonite AC100 base powder with the remaining 1/4 cup of Jesmonite AC100 liquid and the light brown/tan pigment. Mix thoroughly until smooth and lump-free.
⏱️ 5 min - 3
Pour both colored Jesmonite mixtures simultaneously or alternately into the fluted silicone mold, swirling gently with a stick or skewer to create a marbled effect. Do not overmix.
⏱️ 2 min - 4
Gently tap the mold on your work surface several times to release any trapped air bubbles. Allow the Jesmonite to set and harden according to manufacturer's instructions, typically 30-60 minutes for demolding. The full cure time is usually 24 hours.
⏱️ 5 min - 5
Once the Jesmonite has fully set and is firm to the touch, carefully demold the concrete container by gently peeling back the flexible silicone mold. Set the container aside to continue curing.
⏱️ 3 min - 6
In a double boiler or wax melting pot, melt 1/2 cup of soy wax flakes for the flowers over low heat until fully liquid. Stir in the white candle dye until evenly distributed.
⏱️ 5 min - 7
Pour the melted white wax into the small round silicone flower molds. Allow to cool and harden completely (about 15-20 minutes), then carefully demold the wax flowers. Set aside.
⏱️ 5 min - 8
Once the concrete container is fully cured, attach three candle wicks to the bottom of the container using wick clips or a small amount of melted wax. Space them evenly.
⏱️ 3 min - 9
Place wooden wick-centering tools across the top of the container, threading the wicks through the holes to keep them upright and centered.
⏱️ 1 min - 10
In a clean double boiler or wax melting pot, melt 2 cups of soy wax flakes for the candle body over low heat until fully liquid (around 180°F). Remove from heat, stir in the yellowish/light beige candle dye and fragrance oil (if using) until well combined.
⏱️ 10 min•🌡️ 180 - 11
Allow the wax to cool slightly to its pouring temperature (usually around 160-170°F, check wax manufacturer's recommendations). Carefully pour the melted wax into the concrete container, filling it almost to the brim.
⏱️ 2 min•🌡️ 165 - 12
Let the candle wax set for about 30-60 minutes, or until a thin skin forms on top but the wax is still warm and pliable. Use a heat gun on a low setting to gently warm and smooth the top surface of the candle, removing any imperfections or sinkholes. Be careful not to melt the wax too deeply.
⏱️ 5 min - 13
Once the candle has fully cooled and hardened (several hours or overnight), remove the wick centering tools. Gently press three wax flowers onto the surface of the candle, arranging them decoratively. A small dab of melted wax can be used to secure them if needed.
⏱️ 3 min - 14
Trim the wicks to about 1/4 inch above the wax surface before lighting. Your marbled concrete candle with wax flower embellishments is now complete!
⏱️ 1 min